|
Step 1 |

|

|
|
|
Step 1 |
|
|
Step 1
|
Step 1 |
|
|
|
|
Step 1 |
|
|
1. Step 1 dialog of the import procedure will appear after the process initiation:
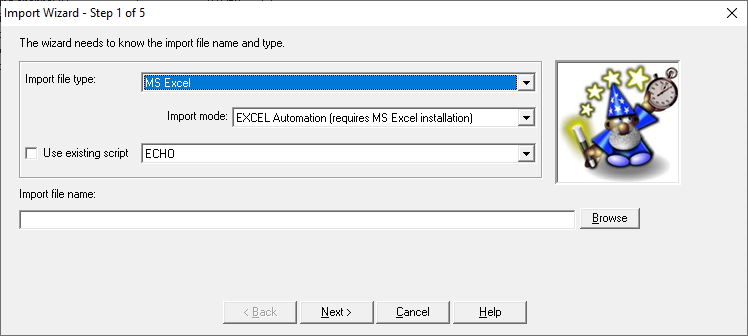
2. Select the desired file type from the list of choices:
| • | Text - for Text/ASCII files, with comma, semicolon or tab delimiters or with fixed-with fields. Suitable also for CSV files. |
| • | Mentor Graphics - for Mentor Graphics "BOARD STATION COMPONENTS FILE FORMAT 2.0". |
| • | MS Access - for MDB files. |
| • | MS Excel - for Excel files (XLS, XLSX). |
If the file type is Excel, you will have additional options to choose the MS Excel file access technology:
| • | ODBC – reading Excel data by ODBC driver. Does not require MS Excel installation on your computer, but has different requirements to Excel file format and different limitations (e.g. data type in each column should be consistent, column names should start with Latin letter, worksheet name should start with Latin letter and should contain only letters and digits, without characters like .,()[]{}-+=#$%^&*`~ or spaces, etc.). It is the technology used by previous versions of RAM Commander |
| • | Excel Automation – requires MS Excel installed on your computer, may work slower than the ODBC mode, but does not have limitations and requirements listed in the "ODBC" item above. Recommended mode. |
3. Select script: the Import Wizard allows you the choice of:
| • | Importing directly from an import file. Use the Import Wizard screens to assist in the preparing the import file for the data transfer into the RAM Commander. |
| • | Using an already existing script with field mapping information. Using existing scripts saves time and effort when importing similar files. Select an appropriate script from the list. Import Wizard prepares your import file for the data transfer according to the specified script. You may add a new script to the existing list of scripts at the last step of the Import Wizard procedure. Adding a new script is recommended when you plan to import similar files in the future. |
4. Select file form import. Press the Browse button, select the file and press "Open".
5. Press Next button.
The next step of the procedure differs for different types of input file: see Step 2 - Text files , Step 2 - MS Excel/Access files or Step 2 - Mentor Graphics files.