After installing RAM Commander, install the component libraries purchased (optional). There are two Component Library installation modes:
| • | Overwrite Library – use this mode if you are a new user. The existing library (for a new user - a default, empty file) is overwritten with the library from the enclosed disk. Once you start the library installation process, you will not be able to recover your original library. |
| • | Merge Library – use this mode if you already have a library of your own. The library from the enclosed CD is appended to the existing library in your RAM Commander package. In this case, the information in your current library is not erased. |
To install libraries
| 1. | Run RAM Commander. (If RAM Commander is already running – close all windows.) |
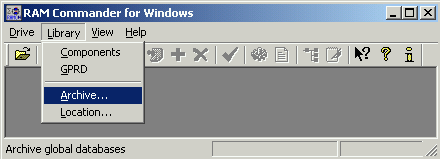
| 2. | From the Library menu, choose Archive: |
| 3. | The Backup-Restore Data dialog box appears: |
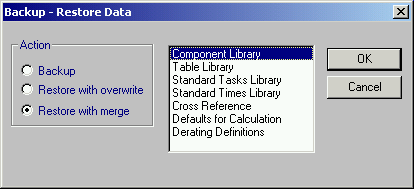
| 4. | In the Backup - Restore Data dialog box, do one of the following: |
| • | To install the library and erase your existing library - choose the Restore with overwrite option button. |
| • | To append the new library to your existing library, choose the Restore with merge option button. |
| 5. | In the list box with library names, select the Component library and Cross Reference and choose OK. |
| 6. | In the Restore Library dialog box, browse to the file located on RAM Commander installation CD - \RAMC\LIBRARY\GLOBAL.RMW (or the same file downloaded from our web site using the link below and authorization code provided by ALD/software vendor: https://www.aldsoftware.com/download/downform.aspx?id=57. Download and store this file on your local hard drive first). |
RAM Commander updates your current libraries with the latest version using the mode selected in step 3 above.

